Sunday, October 6, 2024

New blog coming soon....

Out with the old and in with the new... I am not sure if I am closing this site down or not. I have decided to make a brand new blog and start fresh. I hope you will follow me over there. I am working on a lot so stay tuned for updates. Thank you all for following me all these years and doing my tutorials it has meant so much.

                             New site: Officially Princesa

                                                     -Princesa    


Saturday, July 11, 2020

VOODOO QUEEN


This tutorial assumes your 
knowledge of Corel Paintshop Pro 
and should work well with all versions.
I created this tutorial with my own ideas 
and as such do not copy and claim as your own.
Links are current at time of creation of this tutorial.
I will try to keep them up to date as time goes on. 
Feel free to email me if you think
any information is in error.
Any similarities to any other tutorial is
purely coincidental
-Princesa 20'


Supplies used:
 FTU Scrapkit "Mini One" by
Karmalized Scraps
Font 
Elista
Drop shadow
V4, H4, Op70, B15
Mask(s)
AKK-10 by
Karmalized Scraps
DBV 113 by Designs by Vaybs


Lets begin:
Open new 650x650 transparent canvas
c/p frame 1
resize 75%
see example for placement of this and all following elements
use magic wand and click inside frame
selections, modify, expand by 10
add new raster layer
place paper 2 into selection
invert, delete
place tube, arrange to your liking
delete 
select none
c/p element 24
resize 35%
use eraser tool
erase stems that are sticking out or leave as is
rotate right 45 degrees
adjust, sharpen
duplicate, mirror
c/p element 21
resize 20%
duplicate, mirror, duplicate
c/p element 13 and 14
resize both 35%
c/p element 22
resize 20%
c/p element 3
resize 30%
c/p element 2
resize 15 %
c/p 16 and 7
resize 15%
add new raster layer
select all
c/p paper 4 into selection
select none
load mask AKK-10
merge group
add new raster layer
select all
c/p paper 2 into selection
select none
load mask DBV 113
merge group
add all drop shadows
add copyright info, add your name
merge all visible
save as a png
you are done
thank you for trying my tutorial
-Princesa


Shaz

Thank you


Kittie

Thank you


Sunday, June 28, 2020

SCARS OF LOVE


This tutorial assumes your 
knowledge of Corel Paintshop Pro 
and should work well with all versions.
I created this tutorial with my own ideas 
and as such do not copy and claim as your own.
Links are current at time of creation of this tutorial.
I will try to keep them up to date as time goes on. 
Feel free to email me if you think
any information is in error.
Any similarities to any other tutorial is
purely coincidental
-Princesa 20'


Supplies used:
FTU Scrapkit "Angel Fall" by Chaos Priestess
Tube "Scars of Love" by Zindy Nielsen
Vix_Mask363 and Vix_Mask01 
both by Vix PSP
Drop Shadow
4-Vertical 4-Horizontal 70-Opacity 8-Blur
Font
Bunch Blossoms 
Plugin
Eye Candy 5 Impact-Gradient Glow


Lets begin:
Open new 650x650 transparent canvas
(or whatever size you prefer)
please use example as reference
for placement
c/p frame 1
free rotate left, 20 degrees
resize 80%
adjust, sharpen
c/p heart element
free rotate right, 15 degrees
adjust, sharpen
c/p star cluster element
c/p divider
resize 70%
add new raster layer
select all
c/p paper 3 into selection
select none
load Vix_Mask363
merge group
send to bottom of tag
add new raster layer
select all
c/p paper 6 into selection
select none
load Vix_Mask01
merge group, send to bottom
behind previous mask layer
add your tube, resize and arrange 
c/p flower 1
free rotate right, 15 degrees
resize 70%
adjust, sharpen
c/p flower 3, 4 and 2
merge flower layers
resize 20%
duplicate and arrange as shown in example
you may add as many flowers as you like
I added single flowers 2,3 and 4 
duplicated them a couple times
all resized to 25%
c/p word art
resize 40%
use plugin eye candy 5 impact-gradient glow
default settings
#fffff color
add drop shadows
add copyright info and name
merge visible, save as a png
you are done.
Thank you for trying my tutorial
-Princesa


Moon

Thank you


Shaz

Thank you 


Pammers

Thank you 


Tuesday, June 16, 2020

PURPLE DREAMS


This tutorial assumes your 
knowledge of Corel Paintshop Pro 
and should work well with all versions.
I created this tutorial with my own ideas 
and as such do not copy and claim as your own.
Links are current at time of creation of this tutorial.
I will try to keep them up to date as time goes on. 
Feel free to email me if you think
any information is in error.
Any similarities to any other tutorials
is purely coincidental.
-Princesa 20'


Supplies used:
"Alexandrite" FTU Scrapkit
by Mizteeque
PTU tube by Alicia Mujica
Drop shadow V4 H2 O70 B7
Mask
RR mask set 5_3
by Rachel Designs
Font used Atkinson Signature

Lets begin:
Open new 650x650 transparent canvas
Please refer to sample for placement 
of supplies...
c/p element 28
resize 80%
c/p element 41
resize 80%
c/p element 20
resize 40%
free rotate right
75 degrees
adjust, sharpen
duplicate layer, flip
c/p element 16
resize 45%
duplicate layer, flip
c/p element 40
duplicate, flip
merge down
c/p element 33
duplicate layer, flip
merge down
I took my eraser tool and erased part
of the stems that were sticking out.
You can do the same as you like or just leave it.
c/p element 15
resize 30%
duplicate layer
c/p element 7
resize 20%
c/p element 47
resize 20%
c/p element 26
resize 70%
c/p element 27
resize 45%
add new raster layer
select all
c/p paper 4 into selection
select none
load mask from disk
merge group
c/p element 8
duplicate, flip
merge down
add tube and all drop shadows
copyright info and name
merge all visible
save as a png
you are done!
Thank you for trying my tutorial
-Princesa


Shaz
Thank you

Moon
Thank you 


Wednesday, November 6, 2013

BUTTERFLY BEAUTY


Supplies:
FTU 
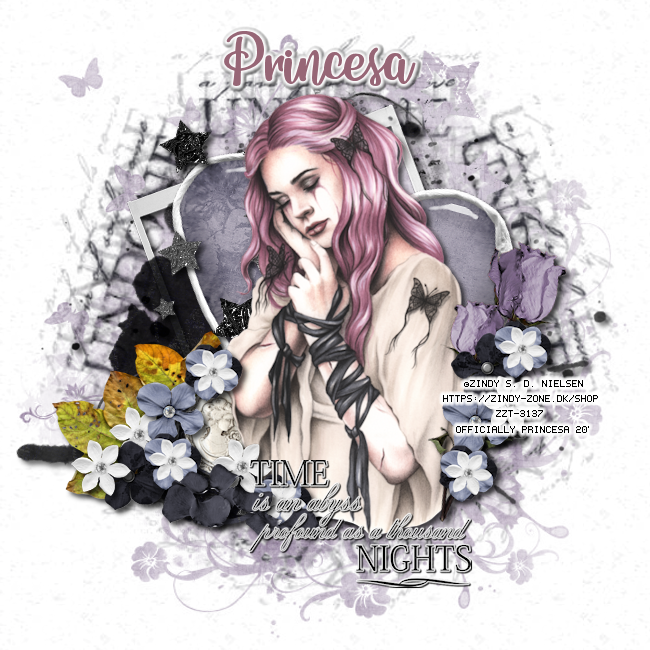
scrap kit by Candy's Treats
 "Shades of Grey" 
HERE
Tube of choice
I used a FTU tube from Zindy Nielsen
HERE
Font 
AL Serenade
HERE

This tutorial assumes you have
working knowledge of PSP.
I am using PSP 9 but I'm sure
any version would work.
This tutorial is mine and no one's else's
Any similarity to another is simply
co-incidence and not done purposely.

Let's Begin
Make a 650x650px canvas.
You may crop and resize later I just
like a little extra space to work with.
Choose cluster frame 3
Copy and paste as new layer
arrange so that frame is in the center
choose magic wand and click
in center of left frame
modify and expand by 4
copy and paste paper 6
or one of your choice
resize paper 70%
making sure resize all layers is not checked
arrange in the position that you like
invert and delete
select none
move paper layer behind frame layer
choose magic wand and click inside right frame
modify and expand by 4
copy and paste paper 9
resize paper 70%
arrange the way looks nice to you
invert, delete
select none
drop shadow of your choice
on the frame
I used 2V 4H 50O 7B
copy and paste element 19
resize 70%
move towards top in between frames
see tag for placement
drop shadow
copy and paste element 22
resize 55%
move underneath heart
drop shadow
copy and paste element 15
resize 50%
move underneath star
arrange so that it's centered between the frames
drop shadow
copy and paste element 3
resize 90%
move layer to bottom of tag beneath
the cluster frame
arrange to your liking
drop shadow

Now for the tube...
I used a gorgeous FTU tube from one
of my favorite artists Zindy Nielsen
but you may use whatever tube
you wish.
Copy and paste tube
mirror
resize 65 %
arrange in whatever spot
looks good to you
choose the magic wand
click in the middle of left frame
modify and expand by 4
invert, delete
select none
move behind frame
copy and paste tube again
resize 65%
arrange how you like
choose the magic wand
click inside the middle of right frame
invert, delete
select none
drop shadow both
tube layers
you may add whatever elements you like
when done merge all layers
now add your name
artist copyright, save as a png and your done.
Make sure when and if you resize the tag that you
adjust and sharpen otherwise the tag
may be blurry.
Thanks for doing my tutorial I would love to see
your results.